Learn how to tape a shoulder with step-by-step instructions, tips, and techniques for pain relief, support, and faster recovery.
If you’ve ever had an affair. Shoulder pain, You already realize how frustrating it can be. One wrong movement, reaching for some high shelf, to throw a ball, Or even a strange sleep- and suddenly your entire day feels off. I remember the first time I tried to move on. Shoulder discomfort But the gym. I said to myself,“ It’ s nothing, only a little soreness.” Spoiler alert: It was nothing.
When I first discovered shoulder Taping, and honestly, it felt appreciated as a game- changer in Reality, where everyday physical challenges demand practical solutions. If you are wondering. How to tape a shoulder, You are definitely not alone.
In this detailed guide, I’ll take you. How to tape a shoulder Step by step, explain why it works, share. Practical tips, And even sprinkles a few personal lessons I learned the hard way. Although you are an athlete, a desk worker, or someone just trying to attain it. Daily life pain- free, This guide is for you.
What do Shoulder Taping actually do?
Shoulder Tapping- especially with kinesiology tape, is Designed by: Support the muscles without restricting movement.
To reduce pain and inflammation Improve. Blood circulation Help with posture and alignment Think of it as giving your shoulder a flexible, constant reminder:“ Hey, stay inside the right position.” I like to compare it. Those subtle nudges A friend gives it to you when you falter. Not powerful, but effective.
When should you Tape your Shoulder?
You don’t have to be. A professional athlete Take advantage of shoulder taping. Actual, most people Those who use it attempt to function normally without pain.
Here is some common situations where taping Helps:
- Shoulder strain or mild injury
- Rotator cuff discomfort
- Gym- related pain
- Posture problems from desk work
- Sports activities Prefer cricket, tennis or swimming
I started personally. Taping during a phase While I was working. Long hours But my laptop. My shoulders were constantly tight, and taping Furnish it to me extra support I didn’t even realize I needed it.
Types of Tape you Can Use
No all tape Equalized. Choosing the right one do a big difference.
- Kinesiology Tape( Most recommended)
Flexible and flexible
Allows full range of motion
Pleasant for daily wear
This is my go- to. It feels natural, almost like it a second skin. - Athletic Tape
Hard and powerful
Limits movement
Best for serious injuries
If kinesiology tape is appreciated by a supportive friend, Athletic tape More like tight armor- it doesn’t allow you to move as much.
What You’ ll Require before starting.
Preparation is everything. Believe me I’ ve Tried to rush this step- and ended up redoing it. The entire taping.
Here’ s This is what you need:
- Kinesiology tape( 2– 3 strips)
- Scissors
- Clear, dry skin
- Optional: a mirror or someone to assist
Pro Tip: If you have body hair I the area, Consider trimming it. Don’t just do it the tape Better stay but needs to be removed much less painful. Learned it. One the hard way…
Step by step: How to Tape a Shoulder
Steps 1: to cut Your Tape
- To cut 2– 3 Tape strips:
- One long strip( to main support)
- One or two shorter strips( for stability)
- One long strip( to main support)
- Round the edges of each strip. It prevents peeling.
Steps 2: position Your Arm
- This part Often overlooked- but it matters.
- Moved your arm A little across your body
- Keep your shoulder comfortable
- It is spread out. The skin A little, allows the tape Once to work efficiently your arm
- But it comes back a neutral position.
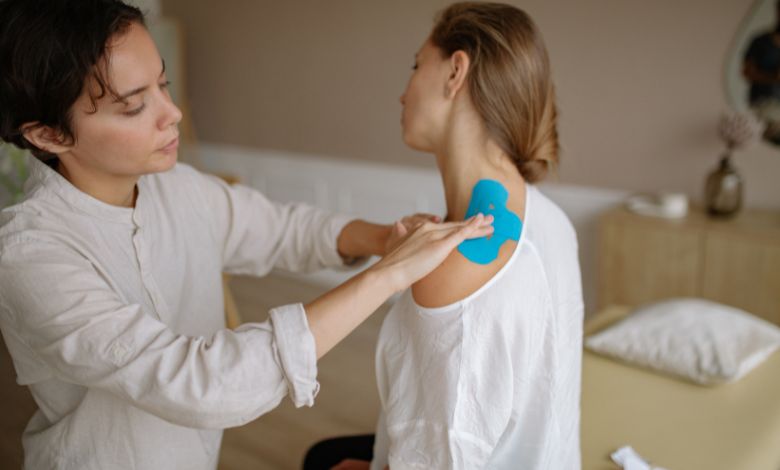
Steps 3: Seek the First Strip( Main Support)
- Anchor the tape But your upper arm( no stretch)
- Pull gently the tape Upwards your shoulder
- Apply with light stretch( not too tight)
- Ready top of your shoulder( No stretch. The end)
This strip Supports the deltoid muscles- the main muscles around your shoulder.
Steps 4: Seek Second Strip( Front Support)
- Obtain started. Near the front of your shoulder
- Apply In italics the shoulder
- Use light to moderate tension.
This helps with stability. The front portion, which are often strained during lifting or pushing movements.
Steps 5: Seek the Third Strip( Extra Stability)
- Keep it all the shoulder Horizontally or inwards an“ X” shape
- Focus on the area Where you feel the most pain
- This step Optional- but incredibly useful if you warrant it. Extra support.
Steps 6: Activate. The Tape
- When all strips are applied: To rub the tape slowly
- It activates the adhesive through heat.
- It’ s A small step, but it will do a big difference
How Tight Should go Tape be
This is one of all common mistakes.
The tape Must feel:
- Supportive, not restrictive.
- Comfortable, not tight
A good rule of thumb? If you feel numbness or tingling, it’ s Very concentrated. I once made the mistake of drawing the tape very difficultly, thinking“ more support= better.” Within minutes, It felt uncomfortable– and I had to redo everything.
Lesson Learned: gentle tension works best.
How Long Can You Keep Going Tape But?
You can:
- Shower With that
- Sleep with him
- To advance around your daily routine
That’s it avoid excessive rubbing or lifting the edges.
Common Mistakes To Avoid
Let us conserve you from it. The trial- and- error phase I passed.
- Much Stretch: More tension doesn’t mean more support- it can actually cause irritation.
- Skin Preparation: Sweaty or oily skin= tape It will not fit properly.
- Ignore Pain Signals: If something feels wrong, remove it. The tape Immediately
- Using Wrong technique: Different injuries May be necessary for different taping styles.
Does Shoulder Taping Really Work?
Short answer: Yes- but together realistic expectations.
- Taping is not a“ magic cure.” This is it. A support tool.
- Think prefer a carrier, a brace or using good posture: It helps. Your body functions better. It reduces stress.
- It supports recovery
- I my experience, applying the tape didn’t make the pain go away immediately- but it did. Movements are easier And give me confidence to stay active.
Shoulder Taping to Different Situations
- To Gym Workouts: Use light support Focus on stability.
- To Daily Activities: Go for comfort over tightness
- To Sports: Together taping with proper warm- ups
- To Recovery: Couple taping with rest and physiotherapy
Personal Experience: mine Shoulder Taping travel
Let me be honest- when I first heard of shoulder taping, I doubted.
It seemed so simple. Is that some tape? Really?
But after the match nagging shoulder pain for weeks, I decided to undertake. The first attempt? Not good: The tape peeled from the inside hours, And obviously I didn’t apply that right.
But the second time… everything changed.
I followed. Proper steps, the right tension, And suddenly my shoulder Felt supported- almost value he had a backup. I could move more freely, and that constant“ tight” feeling began to end.
It wasn’t. A miracle cure. But this was a turning issue. To learn how to tape a shoulder Everything done right is the difference.
Extra Tips to Better Results
- Apply At least surrender 30 minutes Before the activity
- Avoid lotion or oil before application
- Remove tape Gradually( preferably later a shower)
- Change it. Tape If it starts to peel
Often Asked Questions
I can tape mine shoulder by yourself?
Yes, but user a mirror or asking for facilitate it is easier.
Is it safe to sleep with tape But?
Absolutely. It’ s Designed for extended wear.
Can beginners do this?
Yes! Just pursue the step- by- step instructions carefully.
When should I? avoid Tape
Open wounds
Skin irritation
Severe injuries( consult a professional instead)
Key Takings:
- Learning how to tape a shoulder might seem like a small skill,but it can have a surprisingly big impact on your daily life.
- Whether you’re dealing with pain, recovering from an injury, or simply trying to stay active, shoulder taping offers a simple, affordable, and effective solution.
- And if there’s one thing I’ve learned through my own experience, it’s this:
- Sometimes, the smallest changes,like a few strips of tape,can make the biggest difference.
Additional Resources:
- KT Tape for Shoulder Pain: A medically reviewed guide explaining how kinesiology tape supports the shoulder, reduces swelling, and improves alignment. Includes beginner-friendly steps and safety tips.
- Shoulder Taping Instructions – CureTape: Step-by-step instructions for taping the deltoid muscle using multiple strips, covering preparation, positioning, and proper application techniques.


